My lame IR copy toy.

I got a sweet arduino for my bday and it kind of just sat around till i got a few things together to start work on my first project. Well i finally got off my ass, got all the shit i needed and got to work! I am about half way done and i thought i would share my progress so far. heres a little video of my toy in action and i go over the operation and components.

Here is a better view of how its put together:
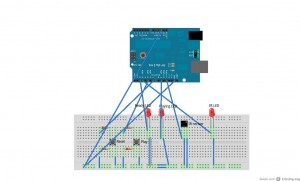
And here is my uber 1337 code 😛

#include < IRremote.h >

int IRRECV = 11;
int READYLED = 9;
int PLAYBUTTON = 5;
int IRLED = 3;
int RESETBUTTON = 7;
int PLAYLED = 2;
decode_results results;
IRrecv irrecv(IRRECV);
IRsend irsend;

void setup()
{
Serial.begin(9600);
irrecv.enableIRIn();
pinMode(READYLED, OUTPUT);
pinMode(PLAYBUTTON, INPUT);
pinMode(RESETBUTTON, INPUT);
pinMode(PLAYLED, OUTPUT);
}
int codeType = -1;
unsigned int rawCodes[RAWBUF];
int codeLen;
void rec(decode_results *results)
{
int count = results->rawlen;
codeLen = results->rawlen - 1;
for (int i = 1; i <= codeLen; i++) { if (i % 2) { rawCodes[i - 1] = results->rawbuf[i]*USECPERTICK - MARK_EXCESS;
Serial.print(" m");
}
else {
rawCodes[i - 1] = results->rawbuf[i]*USECPERTICK + MARK_EXCESS;
Serial.print(" s");
}
Serial.print(rawCodes[i - 1], DEC);
}
Serial.println("");
digitalWrite(READYLED, HIGH);
}

void play()
{
digitalWrite(PLAYLED, HIGH);
Serial.println(rawCodes[0]);
irsend.sendRaw(rawCodes, codeLen, 38);
delay(800);
digitalWrite(PLAYLED, LOW);
}

void reset()
{
int codeType = -1;
unsigned int rawCodes[RAWBUF];
int codeLen;
digitalWrite(READYLED, LOW);
setup();
}

void loop()
{
if (irrecv.decode(&results) && digitalRead(READYLED) == LOW) {
rec(&results);
irrecv.resume();
}
if (digitalRead(PLAYBUTTON) == LOW && digitalRead(READYLED) == HIGH)
{
play();
}
if (digitalRead(RESETBUTTON) == LOW)
{
reset();
}
}

Ok thats all i got, peace.

Flytouch/wowPad 2 Adhoc hack

So i got my sweet ass Flytouch 2 “Android 2.1” last week, after rooting it and updating the firmware i was off having all kinds of fun with my new toy. Then i tried to connect to a Adhoc network “my phone” and was a bit taken back that not only could i not connect to adhoc networks but i couldn’t even see them in my network list. After some time on google and breaking of my wireless i found the right set up to get it working, but it wasn’t very user friendly to say the lest. So i put together a few scripts i/you/someone can use to turn adhoc support on and off with ease 🙂

DOWNLOAD
QR code
After you download to your sdcard and unzip this go into the adhoc folder and edit the wpaon.conf file to point to your AP. Then turn your wifi off get into a term with root access, cd to the adhoc dir and run ahon like so “sh ahon” Then just turn your wifi back on and it should connect right up with the AP you put in wpaon.conf. In order for this to work you must have already rooted your device and have busybox installed.

Stuff i still need to do on this is getting flash to work and upgrading to android 2.2/2.3. If anyone can help me out please drop me a line. Ok thats it enjoy.

Contents of zip:
ahon #The script to turn Adhoc on
ahoff #The script to turn Adhoc off
wpaon.conf #The file you have to edit to point to your Adhoc AP
wpaoff.conf #File used by ahoff, just leave this guy alone
wpabackup #This script will back up your current wpa_supplicant.conf file, run this before using any other tool for the first time.

USBwake

USBwake is a little Android app that just listens for the device to start charging, then while its charging does not let it go to sleep. I was using the wifi tether a lot lately and it would kill my connection everytime my fone would go to sleep so i made this little guy. I hope some one can get some use out of it, enjoy 🙂

DOWNLOAD: USBwake
USBwake QR

Using Unetbootin to create bootable USB drive from iso

I had used Unetbootin to create a USB installer from a Ubuntu ISO image. All went OK in creating and installing the USB image following UNetbootin instructions, so I thought.

The Problem
UNetbootin created menu entries in the bootloader containing invalid arguments.
When booting, it would load the kernel, then kick me to a shell stating
init not found pass init= to kernel
Googling reveals many other users having the same issue.

The Solution
Bootable Linux CDs usually always contain a configuration file for the bootloader. I mounted the ISO image loopback (# mount -o loop image.iso /mnt/mountpoint) and found Ubuntu 10.x is using Grub, which is pretty standard across all Linux distros. Looking at this config file in /boot/grub/loopback.cfg in my instance, I was able to see how Ubuntu was expected to boot.

Here’s what the default menu entry in Ubuntu Netbook image looks like:
menuentry "Try Ubuntu Netbook without installing" {
linux /casper/vmlinuz file=/cdrom/preseed/ubuntu-netbook.seed boot=casper iso-scan/filename=${iso_path} quiet splash --
initrd /casper/initrd.lz
}

Passing kernel=/casper/vmlinuz initrd=/casper/initrd.lz boot=casper to UNetbootin’s bootloader and it booted right up.